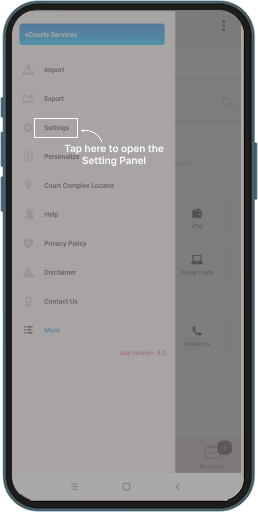
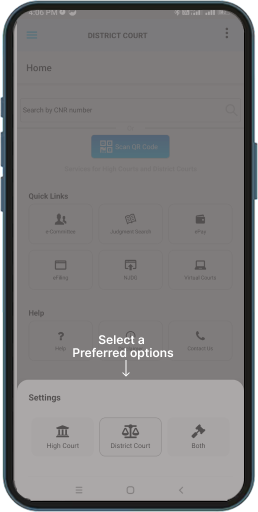
Court Selection
- 1Select ‘Settings’ option from menu.
- 2Choose one of the following:
- High Court
- District Court
- Both
- 3Application will display services based on the selection.
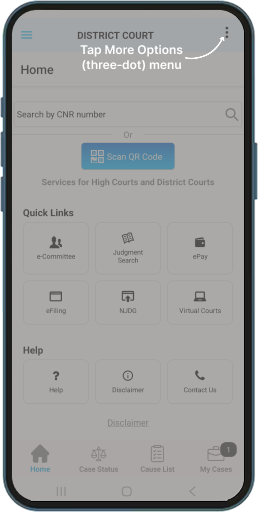
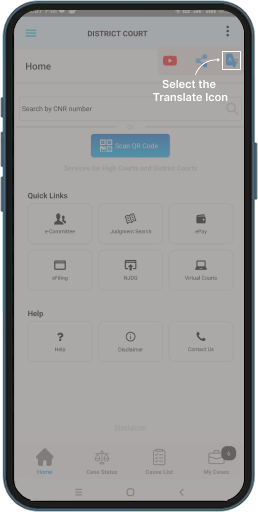
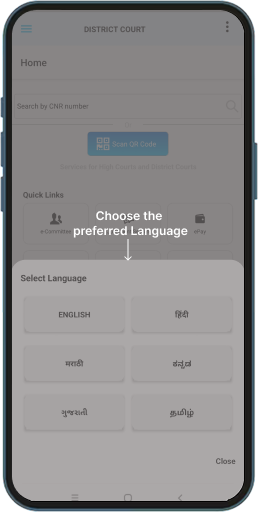
Change Language
- 1Open More Options (three-dot).
- 2Select ’Translate’.
- 3Choose required language.
- 4Application interface language will be updated as per selection.
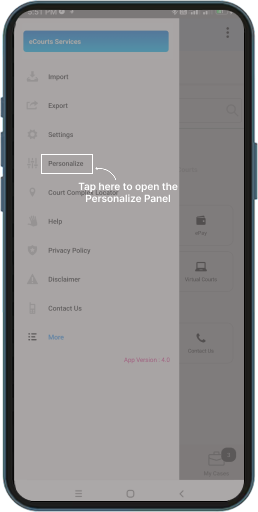
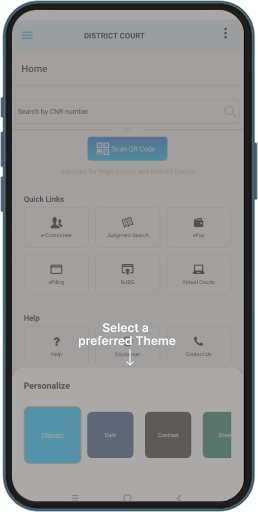
Personalize
- 1Select ‘Personalize’ option from menu.
- 2Select desired theme such as Classic, Dark, Contrast, Green or Red.
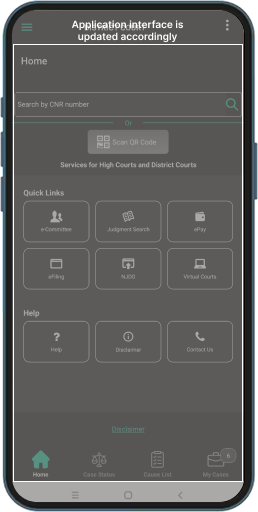
- 3Application interface theme will be updated as per selection.
- 1Enter the 16-character alphanumeric CNR Number without spaces or hyphens.
- 2Select Search icon to retrieve the complete case details.
-
3
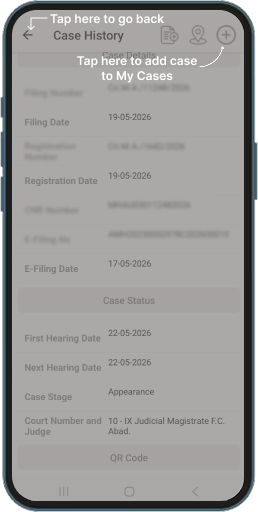
Upon successful search, case history page will be displayed. Detailed information is available in the sections below:
- Case Details
- Case Status
- Hearing History
- Orders
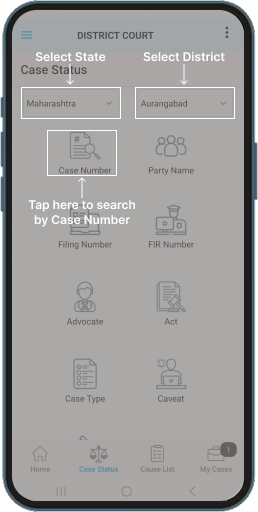
- 4If the CNR Number is not available, case can be searched using alternative options such as Case Number, Filing Number, Party Name, Advocate Name, FIR Number, or Act.

- 1Tap on ‘Scan QR Code’ button.
- 2Point device camera towards the Case QR Code.
- 3On successful scan, Case History will be displayed.


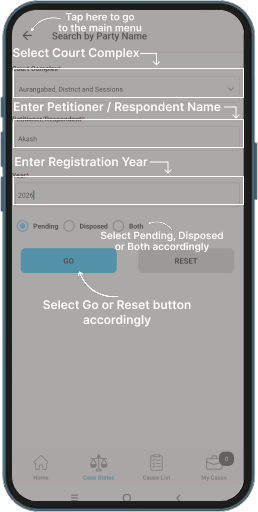
- 1Select Court Complex from respective drop-down list.
- 2Enter Party Name, either in full or using a partial match (minimum three characters). For example, to search for ‘Ramesh Narayan Yadav’, entries such as Ramesh, Narayan, Yadav, Ram, or Nar can be used.
- 3Party Name can correspond to any of the following categories: Petitioner, Plaintiff, Complainant, Respondent, Defendant, Appellant, Accused, or Extra Party.
- 4Enter Case Registration Year in ‘Year’ field.
-
5
Select appropriate case status:
- Pending
- Disposed
- Both
- 6Click on ‘Go’ button to retrieve list of cases matching the specified Party Name criteria.
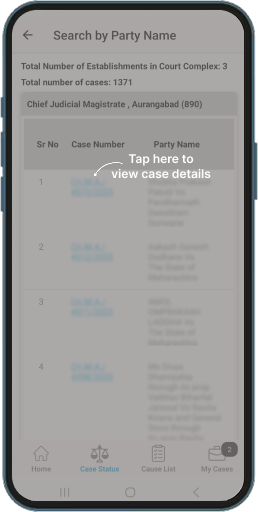
- 7From displayed results, select relevant case number to view complete case history.


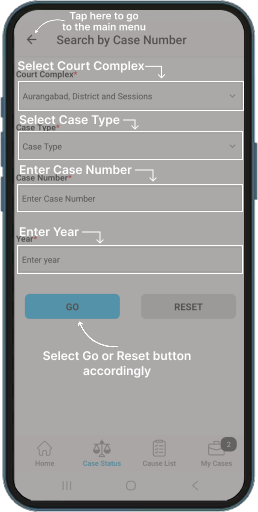
- 1Select desired Court Complex from drop-down list.
- 2Select required Case Type from drop-down list.
- 3Enter Case Registration Number in ‘Case Number’ field.
- 4Enter Case Registration Year in ‘Year’ field.
- 5Select ‘Go’ button to retrieve list of cases matching the specified criteria.
- 6From list of results, select required case to view complete case history.
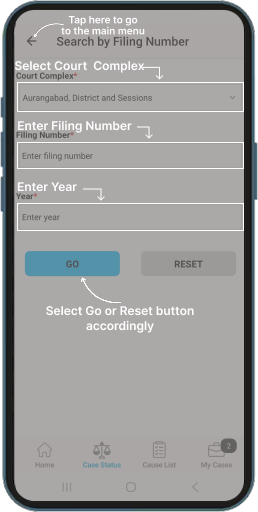
- 1Select desired Court Complex from drop-down list.
- 2Enter Filing Number in Filing Number field.
- 3Enter Case Filing Year in ‘Year’ field.
- 4Select ‘Go’ button to retrieve cases matching the specified criteria.
- 5Based on the entered details, number of matching cases will be displayed establishment-wise.
- 6From list of results, select required case number to view complete case history.

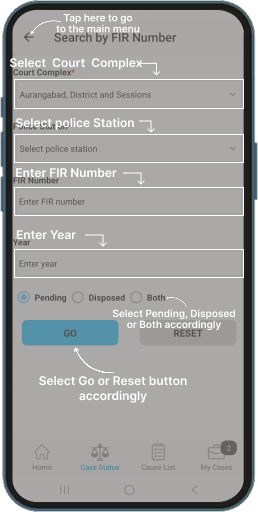
- 1Select desired Court Complex from drop-down list.
- 2Select required Police Station from drop-down list.
- 3Enter FIR Number in ‘FIR Number’ field.
- 4Enter FIR Year in ‘Year’ field.
-
5
Select the appropriate case status:
- Pending
- Disposed
- Both
- 6Select ‘Go’ button to retrieve list of cases matching the specified criteria.
- 7Based on the entered details, number of matching cases will be displayed establishment-wise. From list of results, select required case number to view complete case history.

-
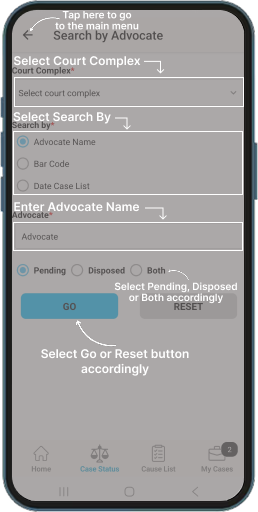
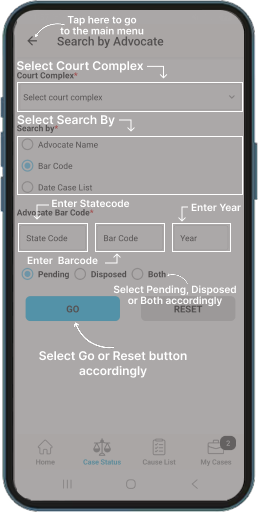
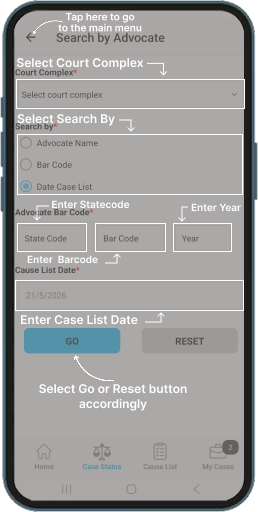
1
Cases can be searched using one of the following options:
- Advocate Name
- Bar Registration Number
- Date-wise Case List
- 2To search by Advocate Name, select corresponding option and enter name in full or using a partial match (minimum three characters). For example, to search for ‘Suresh Manohar Singh’, entries such as Suresh, Manohar, Singh, Sur, or Sin may be used.
- 3To search by Bar Registration Number, select corresponding option and enter registration number in prescribed format, for example: MAH/XXXX/1982, where MAH represents State Code, XXXX represents Registration Number, and 1982 represents Year.
-
4
When using Advocate Name or Bar Registration Number options, select appropriate case status:
- Pending
- Disposed
- Both
- 5To search using Date-wise Case List option, enter the Bar Registration Number and select required date from the calendar.
- 6Enter Advocate Name or Bar Registration Number and click ‘Go’. From the results shown, select a case number to view its complete history.
- 7While using the Date-wise Case List option, select ‘Go’ button to view cases listed for specified date. Select required case to view complete case history.
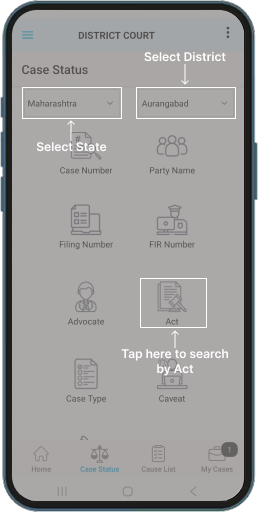
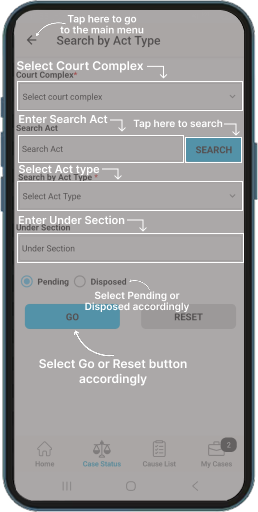
- 1Enter Act Name, either in full or using a partial match, in the ‘Act’ field.
- 2All matching Acts will be displayed in the drop-down list. Select required Act from the list.
- 3If no search criteria are entered, all Acts will be displayed in the drop-down list. Select required Act from the complete list.
- 4Enter Section in ‘Section’ field. If no search criteria is entered, cases corresponding to all sections under selected Act will be displayed.
-
5
Select appropriate case status:
- Pending
- Disposed
- Both
- 6Select ‘Go’ button to retrieve cases matching the specified Act and Section criteria.
- 7From displayed results, select required case to view complete case history.
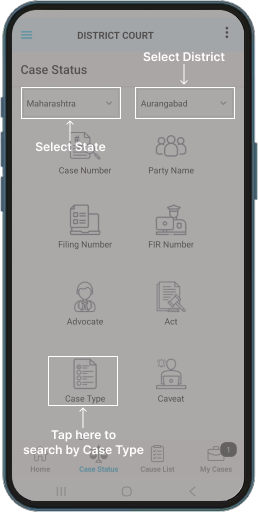
- 1Select required Case Type from drop-down list.
- 2Enter Case Registration Year in ‘Year’ field.
-
3
Select appropriate case status:
- Pending
- Disposed
- Both
- 4Select ‘Go’ button to retrieve list of cases matching the specified Case Type criteria.
- 5From list of results, select required case number to view complete case history.

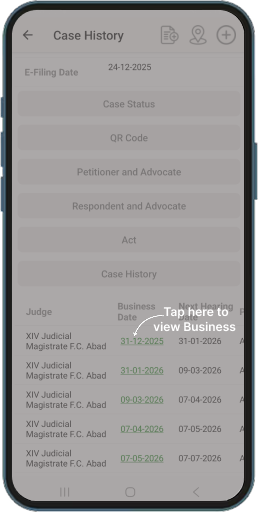
- 1Upon completion of a case search, complete case history will be displayed.
- 2Tap on different sections such as Case Details, Case Status, Petitioner and Advocate, Respondent and Advocate, Case History, Orders etc. to view detailed information
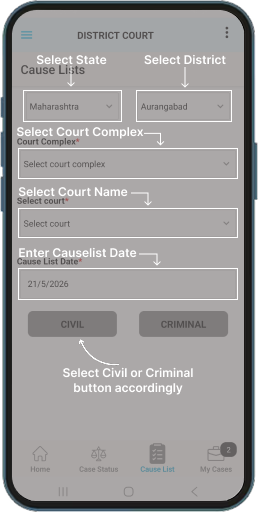
- 1Select required Court Complex from drop-down list.
- 2Select required Court Name from drop-down list.
- 3Select Cause List Date using calendar option.
- 4Select either ‘Civil’ or ‘Criminal’ to display corresponding cause list for selected court and date.
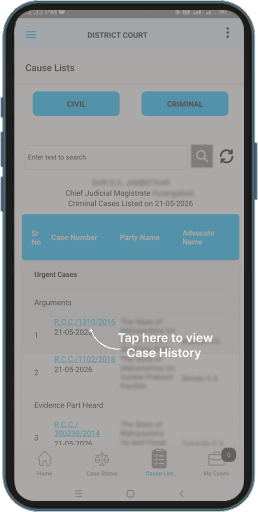
- 5Cause list is displayed based on the selected criteria. It can be browsed, or the search option (if available) can be used to locate specific cases.
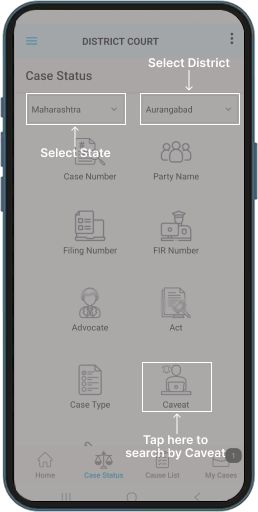
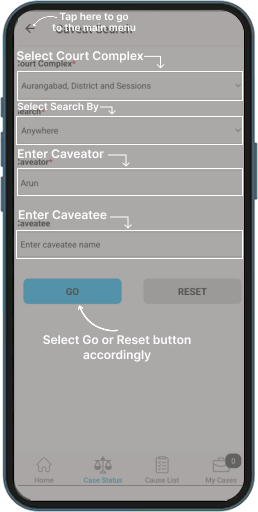
- 1Select desired ‘Court Complex’ from drop-down list.
- 2Select ‘Search Type’ from drop-down list.
- 3Enter Caveator Name and Caveatee Name in respective fields.
- 4Tap on ‘Go’ button to retrieve caveat details matching the specified criteria.
- 5From list of results, tap on desired entry to view detailed Caveat information

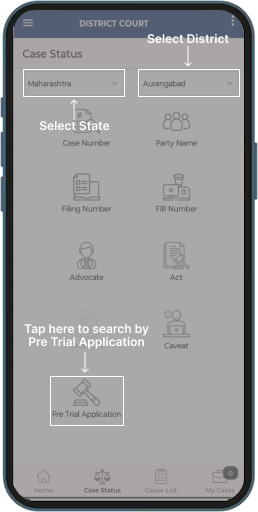
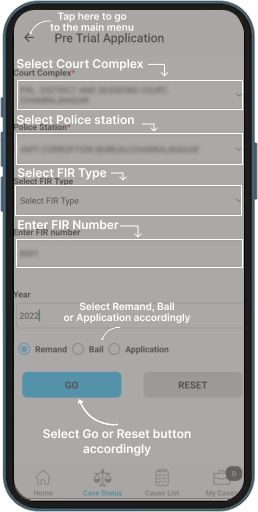
- 1Select desired ‘Court Complex’ from drop-down list.
- 2Select desired ‘Police Station’ from drop-down list.
- 3Enter FIR Number and Year.
- 4Select required Application Type from the drop-down list (such as Bail, Remand, or other application).
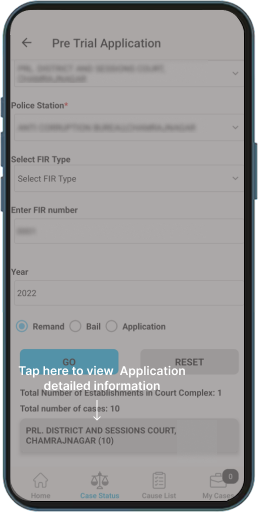
- 5Tap on ‘Go’ button to retrieve application details matching the specified criteria.
- 6From list of results, tap on the desired entry to view detailed information.
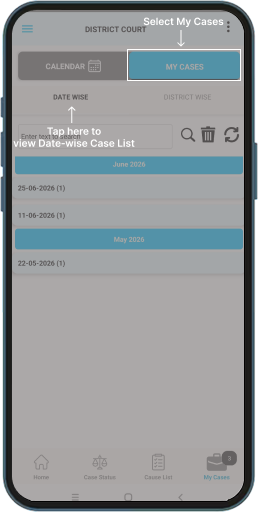
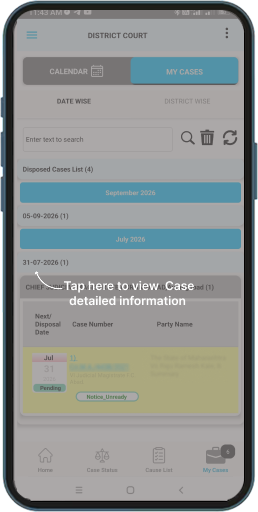
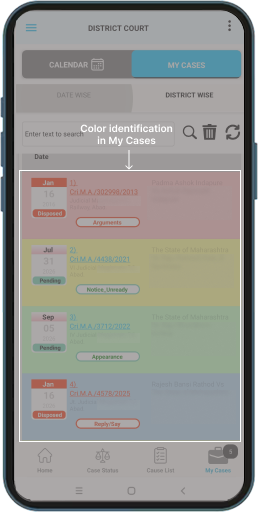
- 1Saved cases are displayed under the ‘My Cases’ section.
- 2Cases are organized date-wise or district-wise for ease of access.
- 3Select a case to view complete case history.
- 4Select ‘Refresh’ option to update latest case details.


- 1Open required case.
- 2Select ‘Add to My Cases’ option.
- 3Case will be saved under ‘My Cases’ section.
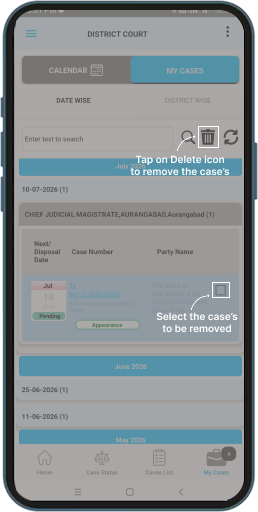
- 1Select case(s) by marking respective checkboxes.
- 2Select ‘Delete’ option to remove the selected case(s) from ‘My Cases’ section.
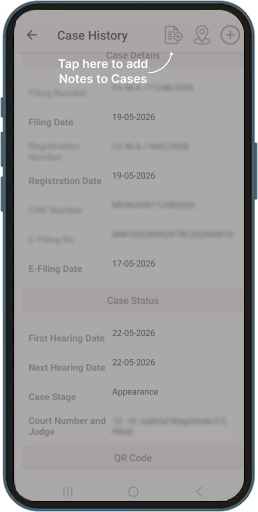
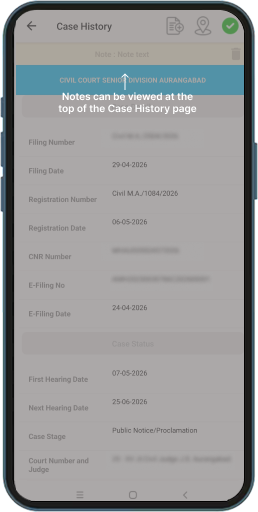
- 1Open required case.
- 2Select ‘Add Note’ option.
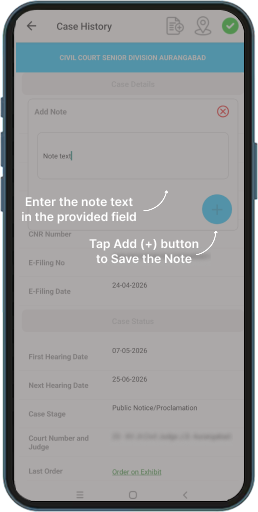
- 3Enter the note in designated field.
- 4Select ‘Save’ option to attach note.
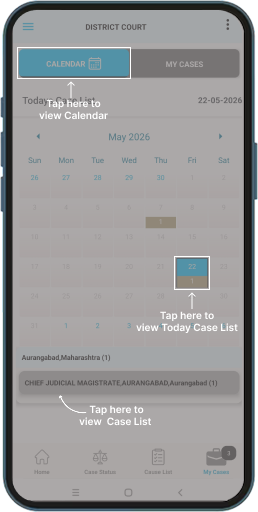
- 1Select ‘Calendar View’ under ‘My Cases’ section.
- 2Select required date from calendar.
- 3Cases scheduled for the selected date will be displayed.
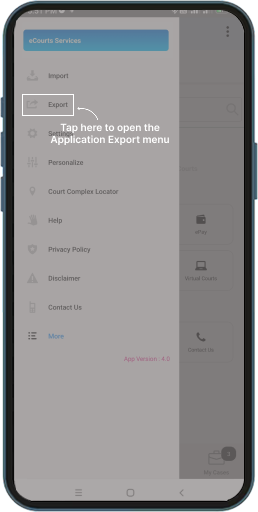
- 1Select ‘Export’ option from menu.
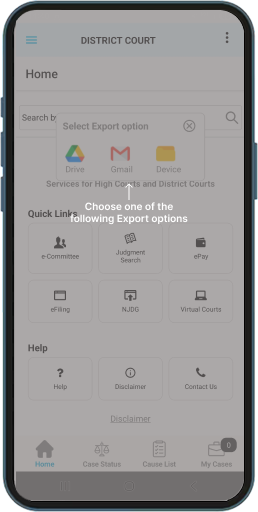
- 2Select export location (Email / Google Drive / Device Storage).
- 3Cases will be exported as a backup file.
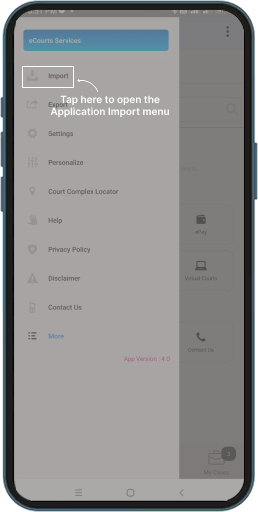
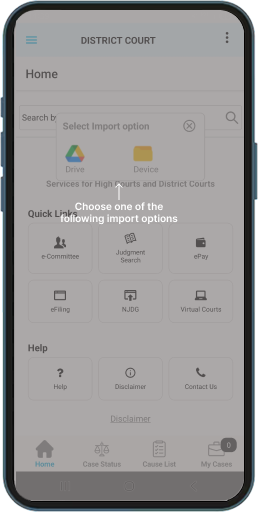
- 1Select ‘Import’ option from menu.
- 2Select backup file from device or Google Drive.
- 3Saved cases will be restored under ‘My Cases’ section.
- Pending over 10 years.
- Pending over 5 years.
- Pending over 2 years.
- Pending less than 2 years.
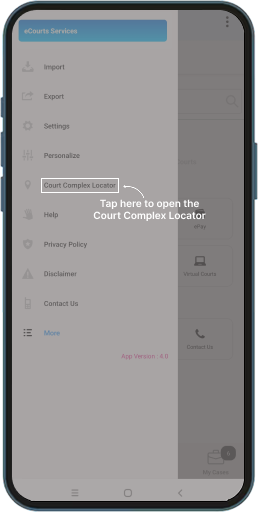
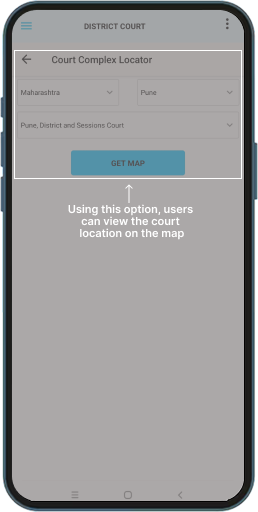
- 1Select ‘Court Complex Locator’ option.
- 2Select required court.
- 3Court location will be displayed on map for navigation.

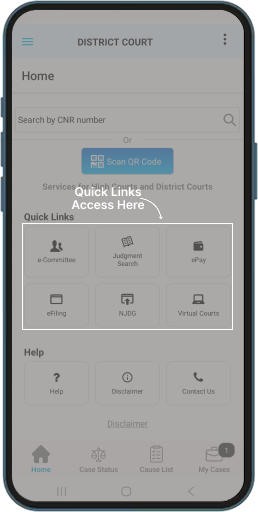
- 1Select ‘Quick Links’.
-
2
Select required service, such as:
- ePay
- NJDG
- e-Filing
- India Code
- Judgment Search
- Virtual Courts
- 3Also, it can be accessed from the ‘More’ option inside menu.
No topics found for your search.